A New Beginning
I’ve never been one to document my studies but this time I want to make an exception. I am starting my bug bounty journey and I want to document my progress. I will be using Hack The Box Academy as my primary learning resource for now.
Now, I’ve been hacking on and off for about over a year now and I’ve thought a lot about bug bounty. I even tried doing it once or twice but never really found anything interesting. I think the main reason for that is that I didn’t have a structured approach to learning and I didn’t know where to start. So, I decided to take a more structured approach this time and start from the basics.
Yesterday, I tried doing a room on TryHackMe and forgot basic recon techniques. I felt so lost and frustrated that I decided to start from the beginning and learn the basics properly. And this time I’m going to hold myself accountable by posting a blog every day.
HackTheBox Academy
I found the Bug Bounty job role path on Hack The Box Academy and I think it’s a great place to start. As with the THM SOC Analyst path, this path also requires a subscription. But I think paying will keep me motivated to finish the path. So here goes nothing.

Day 1 - Web Requests
HyperText Transfer Protocol (HTTP)
HTTP is an application-level protocol used to access the World Wide Web resources.
The URL structure is:

The HTTP flow:

cURL
cURL (client URL) is a command-line tool and library that primarily supports HTTP along with many other protocols.
$ curl -h
  Usage: curl [options...] <url>
  -d, --data <data>   HTTP POST data
  -h, --help <category> Get help for commands
  -i, --include       Include protocol response headers in the output
  -o, --output <file> Write to file instead of stdout
  -O, --remote-name   Write output to a file named as the remote file
  -s, --silent        Silent mode
  -u, --user <user:password> Server user and password
  -A, --user-agent <name> Send User-Agent <name> to server
  -v, --verbose       Make the operation more talkative
In the task, all I had to do was run a cURL command to get the flag.
$ curl <ip>/download.php
HyperText Transfer Protocol Secure (HTTPS)
One of the significant drawbacks of HTTP is that all data is transferred in clear-text. This means that anyone between the source and destination can perform a Man-in-the-middle (MiTM) attack to view the transferred data.
To counter this issue, the HTTPS (HTTP Secure) protocol was created, in which all communications are transferred in an encrypted format, so even if a third party does intercept the request, they would not be able to extract the data out of it.
When someone intercepts and analyzes traffic from an HTTPS request, they would see something like the following:

As we can see, the data is transferred as a single encrypted stream, which makes it very difficult for anyone to capture information such as credentials or any other sensitive data.
(I do know there is a way to decrypt this data and asked one of my university teachers about it. But I don’t remember the details. I will try to find out later.)
Note: Although the data transferred through the HTTPS protocol may be encrypted, the request may still reveal the visited URL if it contacted a clear-text DNS server.
For this reason, it is recommended to utilize encrypted DNS servers (e.g. 8.8.8.8 or 1.1.1.1), or utilize a VPN service to ensure all traffic is properly encrypted.
(Windows does say “Unencrypted” when using the default DNS provided by the ISP.)
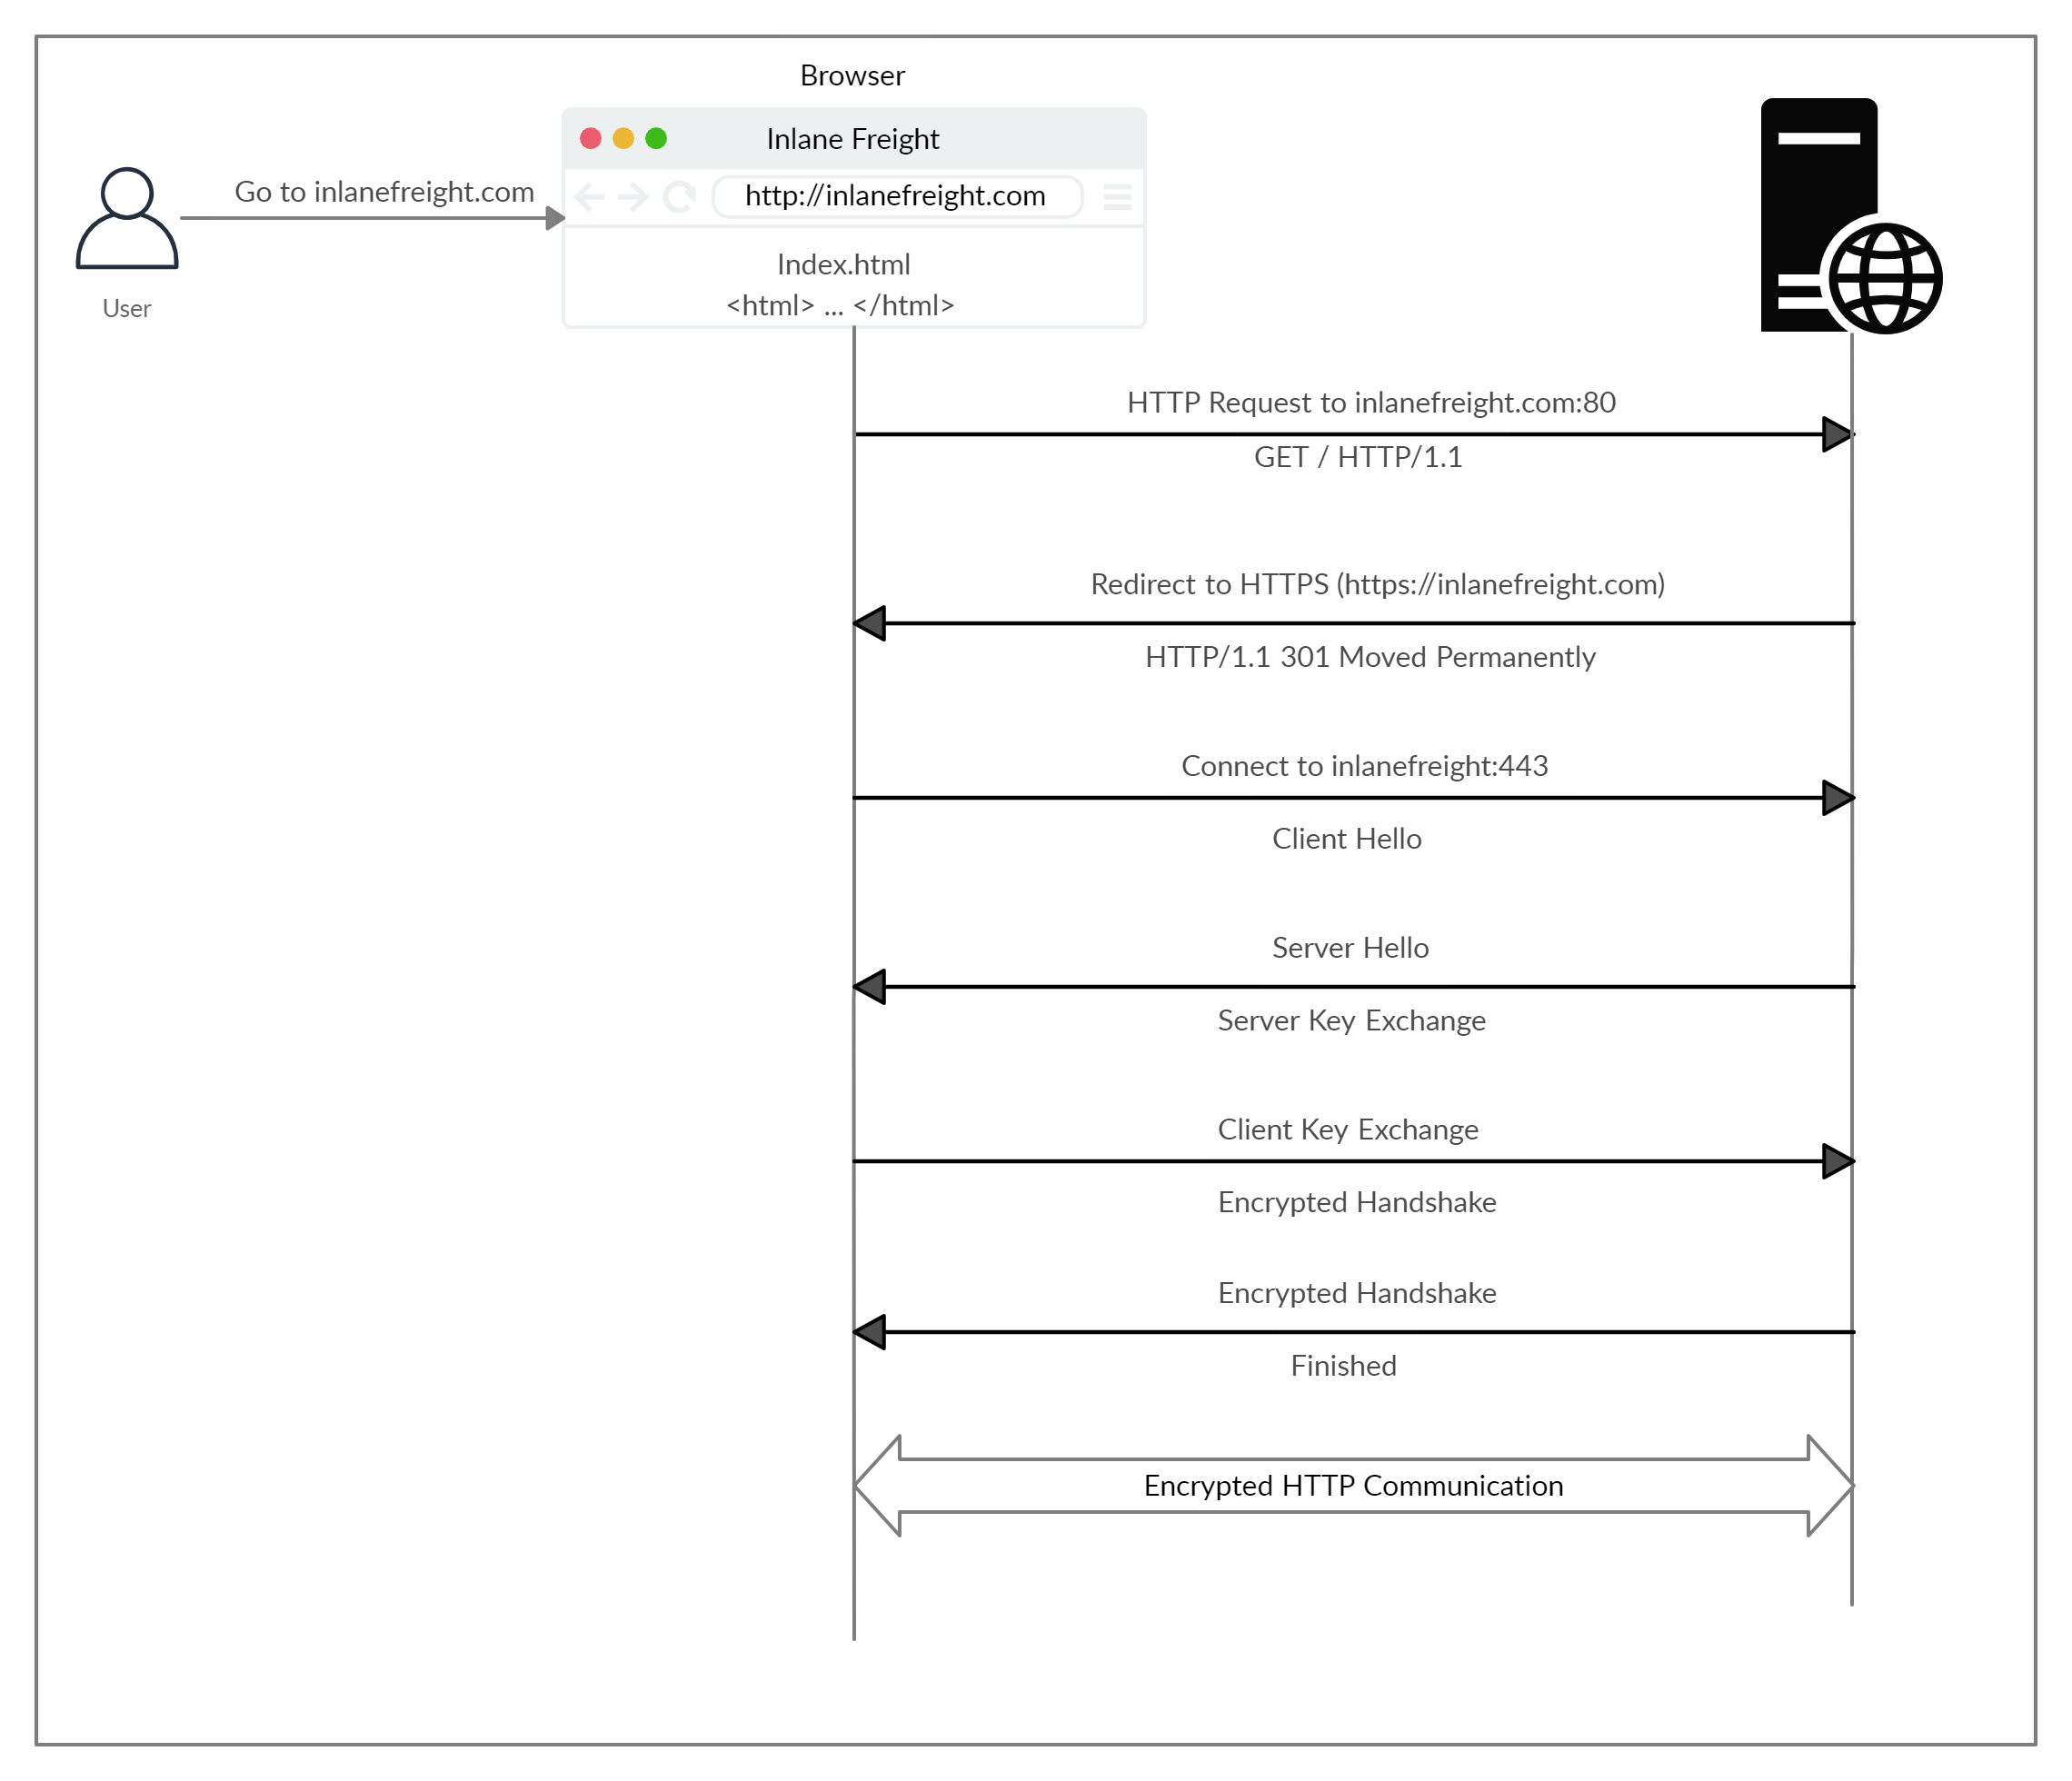
HTTPS flow involves a handshake:

cURL for HTTPS
cURL should automatically handle all HTTPS communication standards and perform a secure handshake and then encrypt and decrypt data automatically. However, if we ever contact a website with an invalid SSL certificate or an outdated one, then cURL by default would not proceed with the communication to protect against MITM attacks.
HTTP Requests and Responses
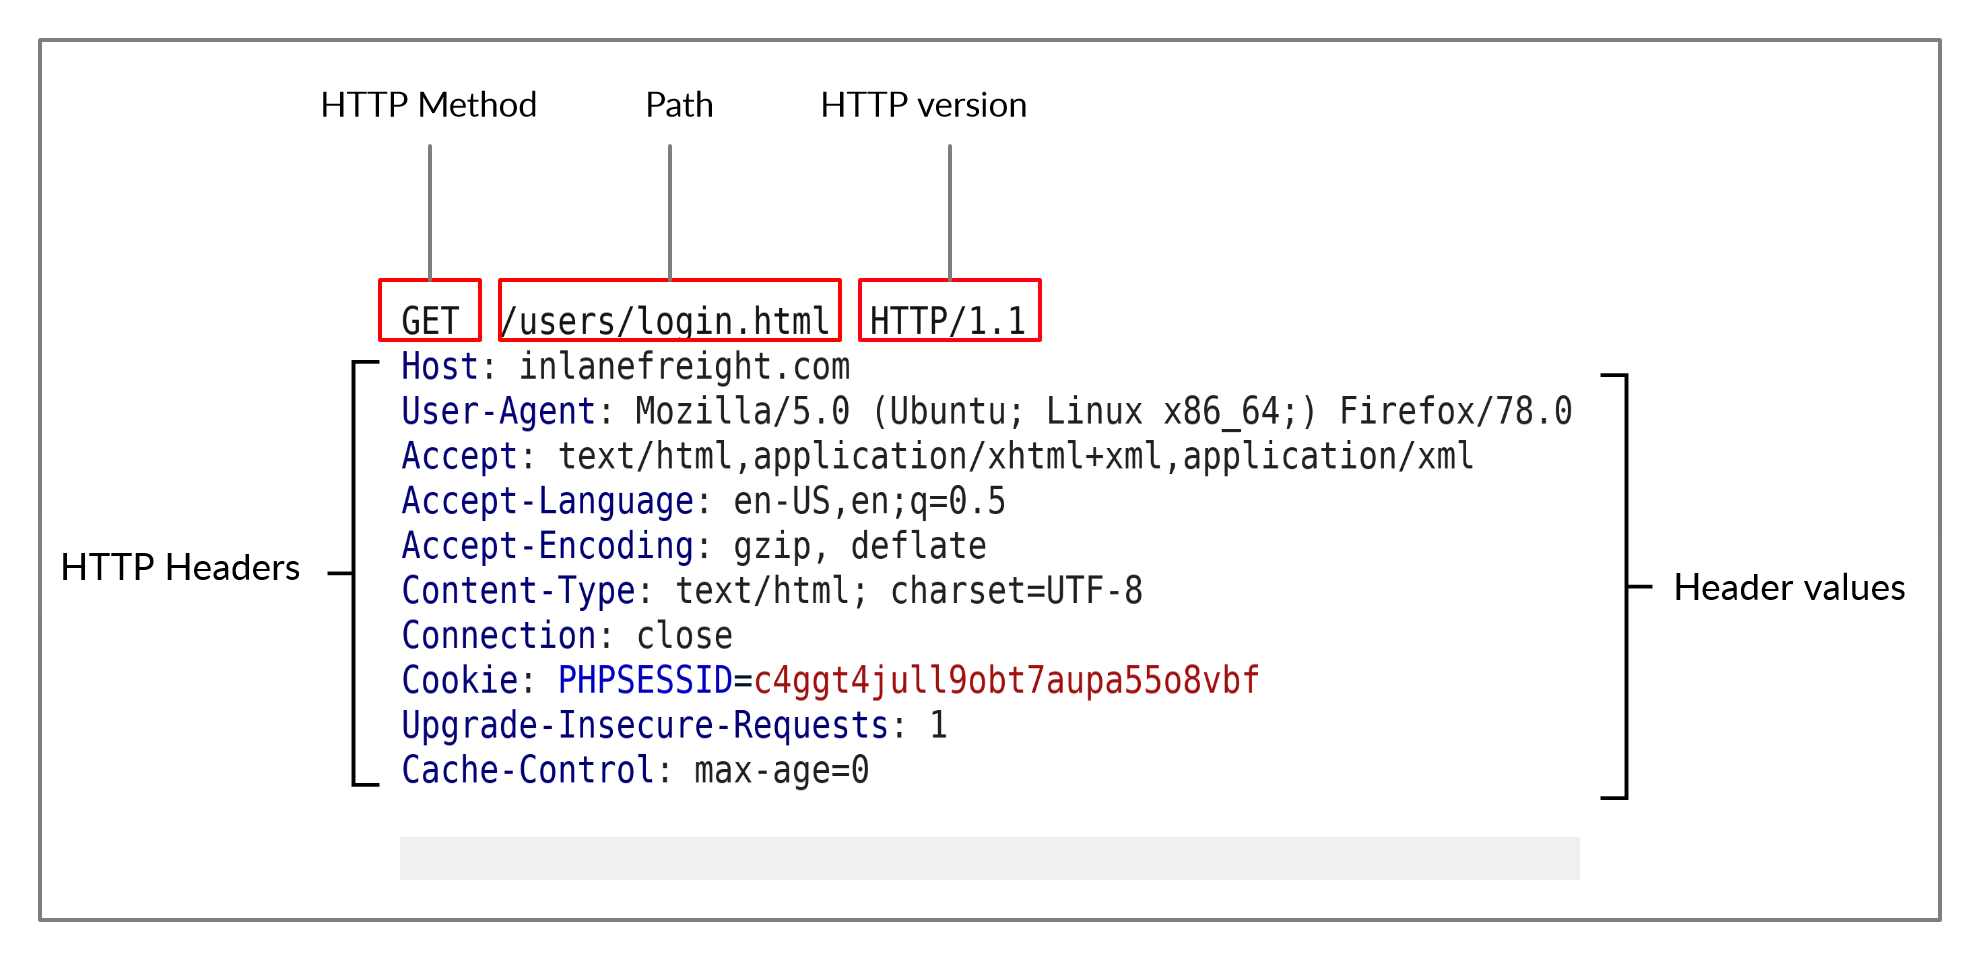
An HTTP request is made by the client (e.g. cURL/browser), and is processed by the server (e.g. web server). The requests contain all of the details we require from the server, including the resource (e.g. URL, path, parameters), any request data, headers or options we specify, and many other options.

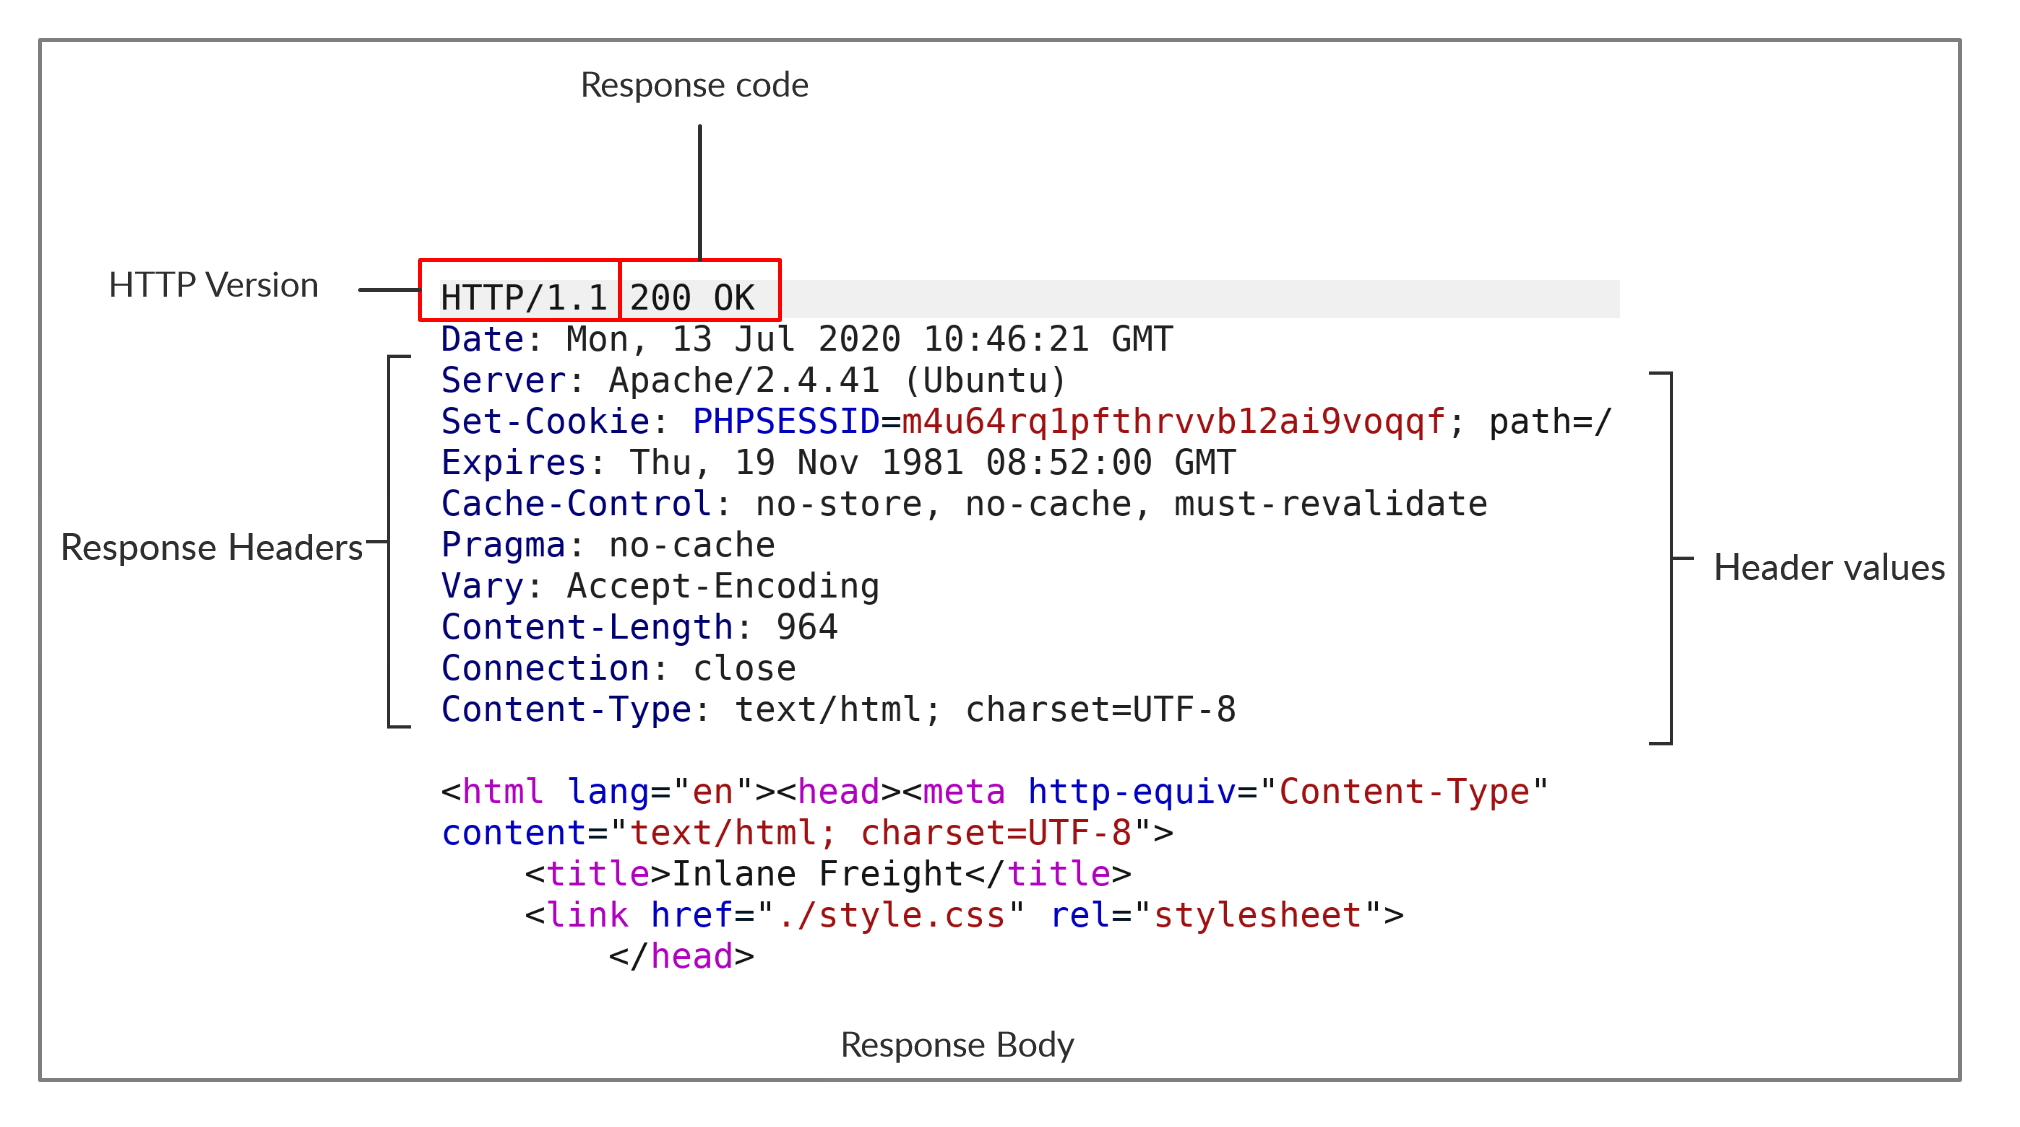
Once the server receives the HTTP request, it processes it and responds by sending the HTTP response, which contains the response code, as discussed in a later section, and may contain the resource data if the requester has access to it.

Note: HTTP version 1.X sends requests as clear-text, and uses a new-line character to separate different fields and different requests. HTTP version 2.X, on the other hand, sends requests as binary data in a dictionary form.
For the task, I just had to send a GET request and see the apache version
$ curl <ip> -v
*   Trying 94.237.123.186:45206...
* Connected to 94.237.123.186 (94.237.123.186) port 45206
* using HTTP/1.x
> GET / HTTP/1.1
> Host: 94.237.123.186:45206
> User-Agent: curl/8.13.0
> Accept: */*
>
* Request completely sent off
< HTTP/1.1 200 OK
< Date: Wed, 10 Sep 2025 12:53:34 GMT
< Server: Apache/2.4.41 (Ubuntu)
< Vary: Accept-Encoding
< Content-Length: 348
< Content-Type: text/html; charset=UTF-8
<
<!DOCTYPE html>
<html lang="en">

<head>
    <meta charset="UTF-8">
    <meta http-equiv="X-UA-Compatible" content="IE=edge">
    <meta name="viewport" content="width=device-width, initial-scale=1.0">
    <title>Blank Page</title>
</head>

<body>
    This page is intentionally left blank.
    <br>
    Using cURL should be enough.
</body>

* Connection #0 to host 94.237.123.186 left intact
</html>
HTTP Headers
Headers can have one or multiple values, appended after the header name and separated by a colon. We can divide headers into the following categories:
- General Headers
- Entity Headers
- Request Headers
- Response Headers
- Security Headers
I skimmed through a lot of text detailing each header. The most interesting were the security headers.
For the task, I had to look at the network tab in developer tools which gave me the flag.
HTTP Methods and Codes
This section listed the basic request methods and status codes. (I’m noticing myself skipping a lot of this information. But I already know this stuff and it should be okay to skip past it right?)
GET
This section was basics of the GET method and Authorization header.
Authorization: Basic YWRtaW46YWRtaW4=
For the task, I had to make a request using curl and search for ‘flag’.
$ curl 'http://<ip>/search.php?search=flag' \
  -H 'Accept: */*' \
  -H 'Accept-Language: en-US,en;q=0.9' \
  -H 'Authorization: Basic YWRtaW46YWRtaW4=' \
  -H 'Connection: keep-alive' \
  -H 'DNT: 1' \
  -H 'Referer: http://<ip>/' \
  --insecure
flag: HTB{flag}
POST
This one was a bit more interesting. It talked about the why POST is used instead of GET:
- Lack of Logging: As POST requests may transfer large files (e.g. file upload), it would not be efficient for the server to log all uploaded files as part of the requested URL, as would be the case with a file uploaded through a GET request.
- Less Encoding Requirements: URLs are designed to be shared, which means they need to conform to characters that can be converted to letters. The POST request places data in the body which can accept binary data. The only characters that need to be encoded are those that are used to separate parameters.
- More data can be sent: The maximum URL Length varies between browsers (Chrome/Firefox/IE), web servers (IIS, Apache, nginx), Content Delivery Networks (Fastly, Cloudfront, Cloudflare), and even URL Shorteners (bit.ly, amzn.to). Generally speaking, a URL’s lengths should be kept to below 2,000 characters, and so they cannot handle a lot of data.
Login Forms
username=admin&password=admin
Authenticated Cookies
If we were successfully authenticated, we should have received a cookie so our browsers can persist our authentication, and we don’t need to login every time we visit the page. We can use the -v or -i flags to view the response, which should contain the Set-Cookie header with our authenticated cookie.
For the task, I had to authenticate and then use the session cookie to search for “flag” using curl.
$ curl 'http://<ip>/search.php' \
  -H 'Accept: */*' \
  -H 'Accept-Language: en-US,en;q=0.9' \
  -H 'Connection: keep-alive' \
  -H 'Content-Type: application/json' \
  -b 'PHPSESSID=0gj1qir1uj7rpk60do9q5nin35' \
  -H 'DNT: 1' \
  -H 'Origin: http://<ip>' \
  -H 'Referer: http://<ip>/' \
  --data-raw '{"search":"flag"}' \
  --insecure
["flag: HTB{flag}"]
CRUD API
| Operation | HTTP Method | Description |
|---|---|---|
| Create | POST | Adds the specified data to the database table |
| Read | GET | Reads the specified entity from the database table |
| Update | PUT | Updates the data of the specified database table |
| Delete | DELETE | Removes the specified row from the database table |
The task was like this:
First, try to update any city's name to be 'flag'. Then, delete any city. Once done, search for a city named 'flag' to get the flag.
$ curl http://<ip>/api.php/city/london -d '{"city_name":"flag"}' -H 'Content-Type: application/json' -X PUT

$ curl http://<ip>/api.php/city/Birmingham -X DELETE

$ curl http://<ip>/api.php/city/flag
[{"city_name":"flag","country_name":"HTB{flag}"}]
Final thoughts
This took longer than I expected honestly. The path said “18 days” (which I think means 18 days to finish), but it doesn’t seem like it’ll be that quick. There are 20 modules and this was one of the shortest modules. I am going to have to grind harder. Towards the end of this module I started skimming over a lot of stuff but I think it’s fine, the flag tasks should be proof enough that I know these concepts (right?). This is just the beginning, let’s see how long I can keep my focus.

Enjoy Reading This Article?
Here are some more articles you might like to read next: